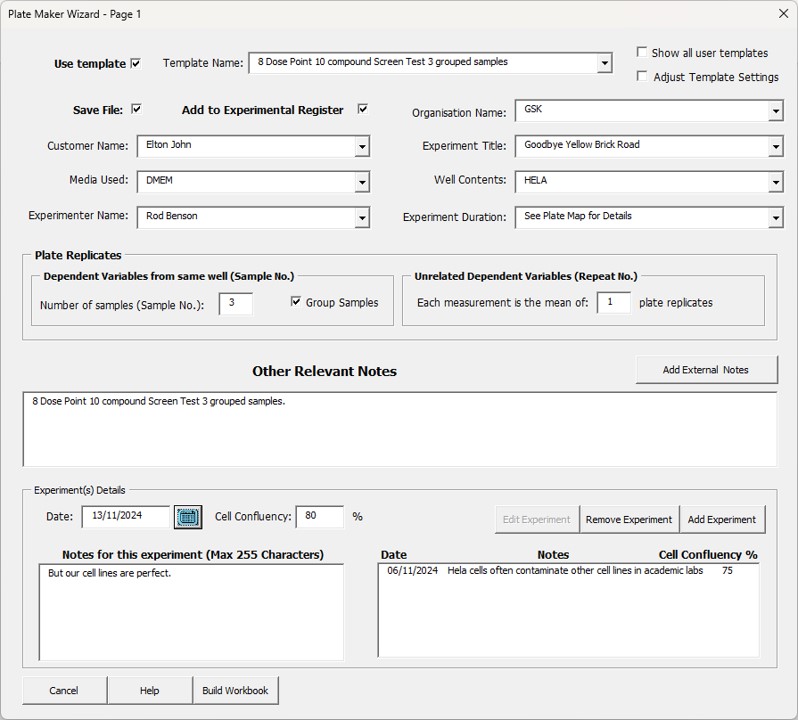
Page 1: Experimental Details
Page 1 Fields
Use template: This option reveals the template dropdown list to allow the user to select a previously saved template.
Template Name Dropdown list: Use this list to select your desired template that has been previously created and saved.
Show all user templates: Normally you will see only the templates that you saved under your computer login name. If you want access to every template in the database, tick the “show all users” templates option.
Adjust Template Settings: Ticking this option changes the “Build Workbook” button back to “Next >” allowing the user to access all the other pages of the “Create New Data Entry Workbook” wizard thus allowing the user to modify the underlying structure of the original template.
Save File: Tick this option to save the workbook you create. If this option is left unchecked, the Platemaker Wizard will build the workbook, but it will not be saved.
Add to Experimental Register: Depending on whether you have purchased the academic or commercial version of the Platemaker Wizard, if this option is ticked then the workbook file path and many of the details recorded on this page are saved to an Access database which can be opened both via the Platemaker Wizard menu and directly by double clicking on the “Experiment Register” Microsoft Access file located in the Platemaker Wizard data folder.
Project/Organisation Name: Allows the user to record the Project or Organisation name which is entered on the Exp Details worksheet.
Project Manager/Customer Name: Allows user to record the Project manager or Customer name if you have the commercial version. To explain the background here, when you are a Contract Research Organisation (CRO) while your customers are organisations, it is the contacts within the organisation who commission work from you that are your physical customers. Therefore, in the commercial version, it makes sense to save your organisational staff inside a folder that bears the name of the organisation which resides inside a folder called customers.
Experiment Title: The title of your experiment. Note, in order for the Wizard to save the file the Project/Organization Name, Project Manager/Customer Name and the Experiment Title are all required because the Platemaker Wizard uses this information to create a folder path to the file which for the Academic Version is:
\Platemaker Wizard Data\Projects\Project Name\Project Manager\Experiment Name\
And for the Commercial Version is:
\Platemaker Wizard Data\Customers\Organisation Name\Customer Name\Experiment Name\
See Tutorial 2. Note if you do not choose to save the workbooks then these fields are just plain text fields. If you do choose to save the workbook then they become dropdown lists that contain the folder structure information inside the Platemaker Wizard’s data folder.
Media Used, Well Contents, Experimenter Name, Experiment Duration: These fields are all included because they are usually highly relevant to the execution of a typical biological experiment. The fields are all dropdown list boxes so as new information is entered, it is saved for reuse in later plate designs.
Plate replicates (samples and repeats): Use these fields to set the sample and/or repeat number of the experiment. You can also elect to group samples together, meaning that all “sample number 1” will be laid out for all the other independent variables of the experiment (except experiment repeats) before the Platemaker Wizard generates the independent variable data values for sample number 2 and so on. Repeat numbers are always generated immediately before all the other independent variables including sample numbers and this cannot be altered. For more information about how independent variables are grouped see Tutorial 3: Controlling how samples are grouped on the plate.
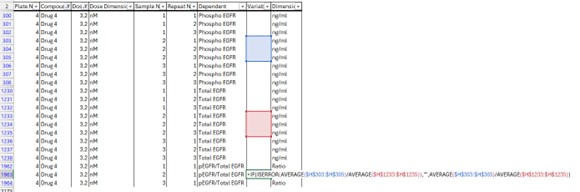
The Difference between Sample Repeat and Plate Replicates
Unlike HCA experiments, you may perform multiple ELISA experiments to derive the relevant measured variables that you wish to explore in your experiment. For example, you may perform two different ELISA’s one with an ELISA plate that measures total receptor levels while a different ELISA plate measures the phosphorylation status of the same protein. Unlike an HCA experiment, the plate repeats are not coming from the same well because they are not coming from a single plate. Therefore, if you wish to ratio the measurements, you cannot simply divide sample 1 (measurement 1) by sample 1 (measurement 2) because in the ELISA assays, measurements 1 and 2 have come from different plates. Therefore, in this instance, the right mathematical calculation is to average the plate replicates, which constitute a particular treatment, before the ratio is calculated and this is why on Page 1 of the Platemaker Wizard it is possible to specify plate replicates as distinct from sample repeats. In the “Ovarian Cancer Screen Demonstration” the two HCA parameters are “Cell Count” and “Cell Death”. Both these measurements are derived from the same well. However, if these two measurements were obtained from different plates, then one would enter the 3 sample repeats as 3 plate replicates. How this affects the Platemaker Wizard calculations is shown in Figure 1 below.
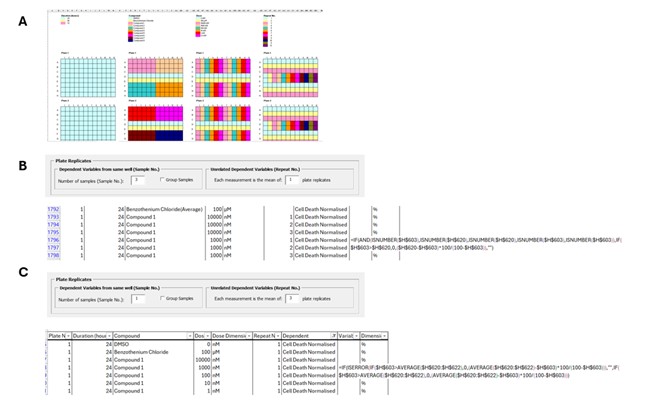
Now imagine for a moment you have prepared 3 different lysates from an experimental system, and you then place them on an ELISA plate. When you do this, you may wish to also create plate replicates so that your 3 samples are placed 3 times on your plate creating 9 individual readings. Your plate layout in this instance might look like Figure 2.
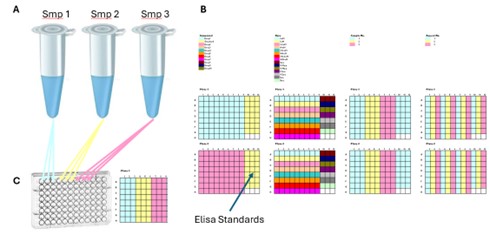
In this instance, although each dependent variable reading is coming from a different plate, the lysates from which the readings are obtained remain identifiable because wells A1, A2 and A3 all receive lysate from sample 1 while wells A4, A5 and A6 all receive lysate from sample 2 independent of what the plate is measuring. Therefore, in this example, only the repeat numbers need to be averaged before the ratio is calculated giving a unique measurement for each lysate sample that constitutes 3 estimates of that treatment condition (Figure 3).
For HCA this subtlety is never encountered because one is always mathematically combining one measured variable against another measured variable from the same plate. Thus, with HCA you only ever have sample repeats, not plate repeats, so the “Repeat No.” on Page 1 of the Wizard is always equal to 1.
Other Relevant Notes: This field allows the experimenter to record notes that relate to the general design and execution of the experiment. You can simply go to your lab books notes (in whatever software that supports your lab book), select the appropriate section you want to copy into this field, push <Ctrl>+C and then switch back to Excel (in Windows you can switch between software by using the <Alt>+<TAB> keys) and then use the <Ctrl>+V keys to paste these notes from the computer’s clipboard into the “Other Relevant Notes” field. If the information you want to copy into the field is located in an Excel workbook, then you can use the “Add Notes from Excel Workbook” button. Note you should have the relevant workbook open before you run the “Create new data entry workbook” wizard. If you open a new workbook after you pushed the “Add Notes frow Excel Workbook” button, while the workbook will open, the little range selector button below will disappear.
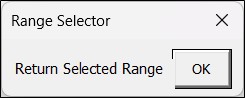
Use the <Alt>+<TAB> keys to switch back to the workbook that contains the Range Selector menu. Click OK and then repeat the process by clicking the “Add Notes from Excel Workbook” button a second time. Assuming you now have more than one workbook open a larger Range Selector menu will appear with a dropdown list that allows you to switch to the workbook from which you want to copy data (Figure 4). The process is summarised in Figure 5.

Experiment(s) Details: This section allows the user to enter the date when the experiment was conducted, any notes that relate specifically to the execution of that particular experiment rather than more global notes about the experiment that were added to the “Other Relevant Notes” section, and a field is provided to record cell confluency as this single experimental variable can be very important in determining biological behaviour in in vitro biological experiments. This information can be added to the bottom right list box using the Add Experiment Button so that multiple experiments can be recorded. This information is transferred to the Exp Details worksheet as a table and an example can be seen by viewing the demonstration workbook shipped with this program.
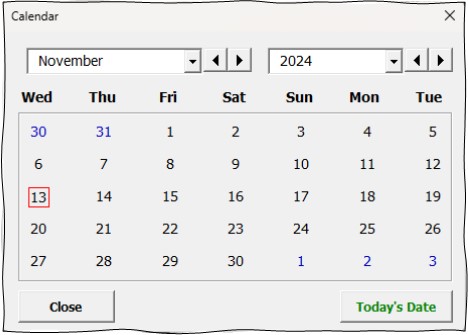
Date Field: type the date into this field directly or click the  to bring up a calendar to help the user select the correct date on which the experiment was performed.
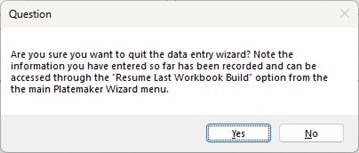
Cancel button (for all pages): Cancels the current operation of the Platemaker Wizard and returns the user to Excel with the following dialogue box.
This option is particularly useful if you require information from another workbook but forgot to open it or did not have it active when you started to define the new workbook build that requires this information. Annoyingly, even though you can gain access to an open workbook using the “Add buttons” provided throughout the wizard, only the workbook that was active when you started the “Create New Data Entry Workbook” can provide data to go back into the forms of the wizard as the dialogue box that allows you to return to the wizard is only accessible from that single open workbook.
Help button (for all pages): Brings up the appropriate help page from this section of the Platemaker Wizard instruction manual.
Next > button: Steps forward to Page 2, Define Independent Variables.