The Range Selector
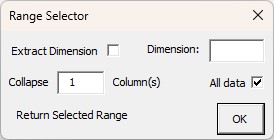
If the independent variable that you are returning data to is numeric, then the range selector will have the following fields active.
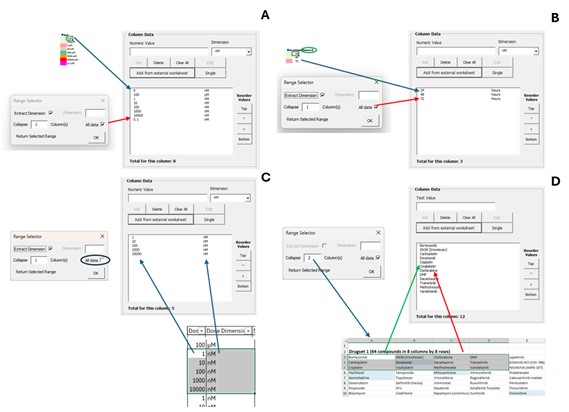
Extract Dimension: If you select cells that contain numbers followed by letters then the program will split the numbers from the letters placing the numbers in the numeric part of the Column Data list box and the text component into the Dimension column of the Column Data list box field as shown in Figure 1A. If you select a set of numbers from a plate map key, and there is a title that contains a dimension in brackets, then the range selector will be able to extract the dimension from that title (Figure 1B). If you select two columns of data, one with numbers the other with letters, then the numbers column will be added to the numeric part of the column data list box and the 2nd column with text will be added to the dimension column of the data list box (Figure 1C).
Dimension Field: If you choose not to Extract dimension automatically, you can manually enter it in this field so that it is imported with your selected number data.
All Data: If you have the Excel workbook cursor on a single worksheet cell and you have ticked the “All Data” option, then the Platemaker Wizard will extend the selection, so it contains all the rows below the selected cell that contain data. Note: if you already have a range selected, then the “All Data” option is ignored.
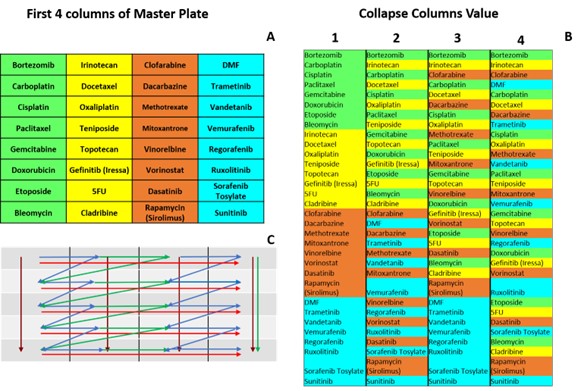
Collapse Column(s): The collapse Column(s) field controls how multiple selected columns are converted into a single column of values as described in Figure 2. Likewise, in Figure 1D (above), text data that occupies 4 columns and three rows is being imported. The 4 columns are converted to one by copying (in rows) the first two columns, and then the second two columns.
The Range Selector when the multiple toggle button is active
If you choose to Add data from an external workbook and you have the toggle button depressed to return multiple values, then the range selector contains an extra section as shown.

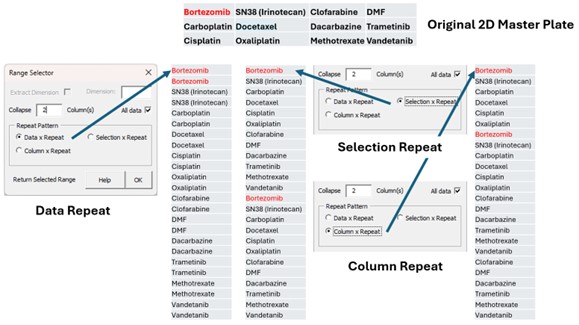
This extra section controls how the data you have selected will be replicated by the multiple value that you have entered next to the toggle button in the Column Data section of page 2. The “Data X Repeat” simply replicates each data point by your multiple value and is equivalent to you typing in each individual value while you have the multiple button active and a replication number in the field next to the toggle button.
Likewise, the “Selection X Repeat” just takes whatever the total set of data is to be returned to the Column Data list box and replicates it by the number you have entered in the multiplier field. This is equivalent to you first entering the data, selecting it all in the Column Data list box, and then pushing the “X” button below the navigation keys.
The final option is the “Column X Repeat”. This option replicates the incoming data based on the collapse columns value entered above. If the collapse column value is set to the same number of columns as the range you are returning, then it will have the exact same effect as the “Selection X Repeat” Option. However, for every column value less than the total columns in the selected range, the program will first take the subrange as defined by the number of columns, and then replicate that subrange. Therefore, if collapse column equals 1 then column one will be replicated by the multiplier number you have entered. If collapse column equals 2 then columns 1 and 2 will first be entered (in rows) as described above and then this data chunk replicated by the replication number you entered. In the example below the multiple button on page 2 is set to 2 and a small 2D matrix 3 rows by 4 columns has been selected. Figure 3 shows the three possible ways these data will be returned to the list box depending on whether the Data X Repeat, Selection X Repeat or Column X Repeat option is selected.