Importing Generic Plate Data
Background
The output of most plate reading instruments are simple CSV files (which open in Excel as single page workbooks) or sometimes native Excel files with a list of numbers in table(s) that match the dimension of the original plate read. The Generic Platemaker Wizard Import function simplifies the movement of numerical data from the spreadsheet(s) produced by plate reading machines to the workbook that has been created with the Platemaker Wizard. Before the user selects Import Data, they should have the workbook that is going to receive the data open as well as all the workbook(s) or CSV files that contain data to be imported open (Figure 2).
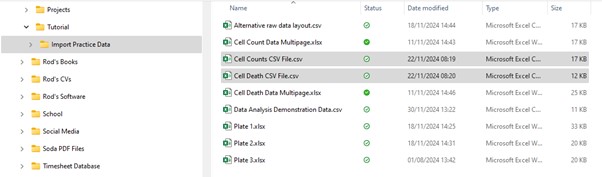
Once you have the workbook you wish to import data to, and the workbook(s) that contain the data you want to import from open in Excel, you can then select Import Data from the main Platemaker Wizard menu.
A little windows tip, you can open multiple Excel files in one step by selecting the files you want to open and then right clicking the mouse to bring up the file context menu where you can select open.
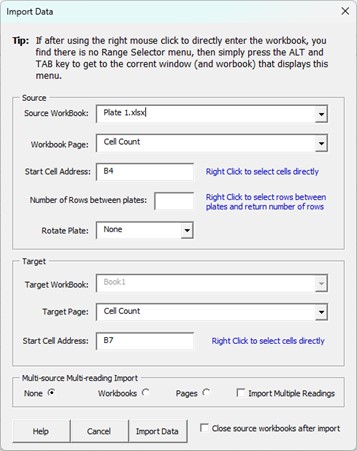
When the user selects “Import Data” the screen in Figure 1 appears. The Platemaker Wizard looks for the existence of the “Flat Data” worksheet in Excel workbooks to determine if they should appear in the target or source workbook list boxes. Therefore, if you want import numbers from an old Platemaker Wizard workbook, simply delete the “Flat Data” worksheet and it will then appear in the source workbooks dropdown box.
The Source Section
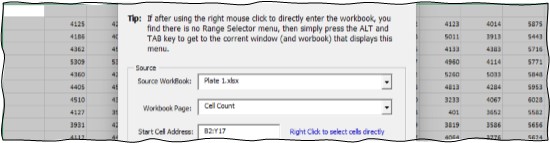
When the import data form loads, all source data workbooks, which contain valid data, are loaded into the source Workbook dropdown menu in alphabetical order. The first workbook from that source list is then selected and appears behind the import menu. If this workbook has more than one worksheet in it, then all the worksheets, that contain data will be included in the “Workbook page” dropdown list. If you select a new worksheet from that dropdown menu, you will see the worksheet change behind the form. Likewise, in the “Start Cell Address” field you can type a single well address (eg “B2”) or a range like “B2:Y17”. As you type this information, you will see the Excel cursor change behind the form to indicated which wells are currently selected.
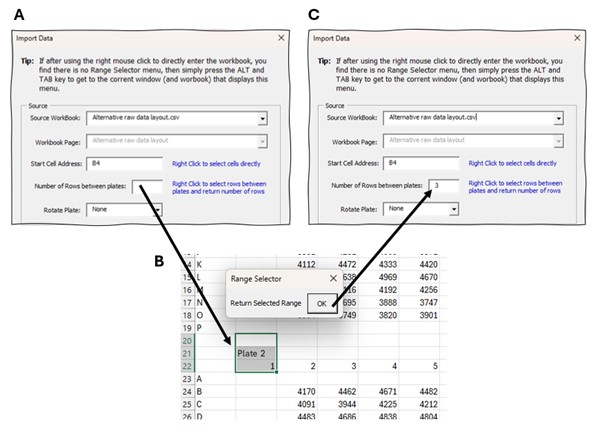
If there is more than one source workbook, you can select a different workbook using the “Source Workbook” dropdown list although the workbook view behind the form will remain on the source page that was selected when the form first loaded. If you right-click on the cell start address (Figure 3A) you will be taken directly to the workbook listed in the dropdown box (Figure 3B). You can now move your cursor to the desired first well of the first plate (in our example this is cell B2) and when you push OK, the selected cell address will be transferred back to the Start Cell Field (Figure 3C).
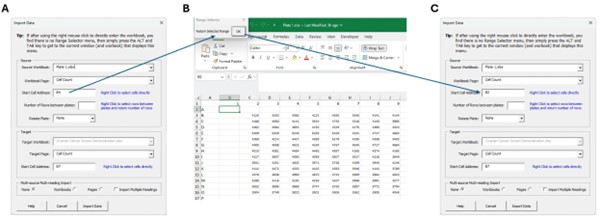
If you have changed the source workbook in the source workbook dropdown list before right clicking on the mouse, you might find you are taken to the original workbook you were in when you first ran the Import program rather than the workbook you subsequently selected in the “source workbook” field. In this situation, there will be no Range Selector menu showing. To fix, simply push the TAB key while holding down the ALT key to switch to the correct workbook which will also then display the Range Selector menu as shown in Figure 3B.
Number of wells between plates
If your plate machine puts multiple plates in the same worksheet, you will need the indicate the number of rows between each plate. The safest way to do this is to place your cursor in the “Number of Rows between plates” field and right click the mouse (Figure 4A) to be taken directly to the worksheet page. You will then select the number of rows between the bottom of one plate and the top of the next plate as shown in Figure 4B. Once you have this range, simply push the OK key on the range selector menu and the number of rows will then be transferred to the “Number of Rows Between Plates” field as shown Figure 4C.
The Target Section
Normally, when it comes to the target workbook the only thing that might be required is to select the correct one (assuming you have more than one workbook open that was built by the Platemaker Wizard). The Start Address of B7 is always the first well of plate 1 for any container worksheet that has been created by the Platemaker Wizard. The only time you may want to change this address is if you want to import data into a plate that is not plate 1 or you want to important a subsection of a plate.
In the example of Figure 4, if the user pushes the Import button at this point the three plates from the Alternative Data Layout.csv will be imported into three plates of the Cell Count container worksheet of the target workbook. Note if the user had left the rows between plates blank, then only the first plate would be imported.
Multi-source Multi-reading import
This section allows the user to achieve all data import into all the dependent variable plates contained within the target workbook in a single step using the Platemaker wizard generic import function.
None: the default option. When this option is selected, only a single plate will be imported unless the “Number of rows between plates” field has been set to indicate that there are multiple plates of data on the worksheet and the row spacing between those plates.
Workbooks/Pages: Selecting either option pops up the sub-form shown in Figure 5. When these options are active, the “Number of rows between plates” field becomes inactive because you have elected to import multiple plates from different worksheets or workbooks rather than multiple plate areas from a single worksheet.
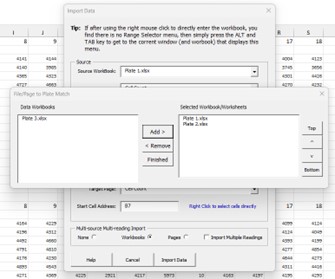
File/Page to Plate Match sub-form
This form contains a list box that lists all the open workbooks inside the Excel workspace (if you have selected the workbooks option) or all the available pages (if you have selected the worksheets option) that are contained in the currently selected source workbook that is referenced in the source section of the import form.
Add button: You can select any one of the available workbooks/pages listed and use the Add button to add it to the “Selected Workbook/Worksheets” list box. The order of the items in the “Selected Workbook/Worksheets” list box will determine the order the data is accessed and added to each empty plate inside the target workbook with each list item source plate being loaded into a single target plate.
Remove button: Removes any items selected in the “Selected Workbook/Worksheets” list box and returns them to the Available items list box.
List order buttons: Use the Top, Bottom, Up and Down arrows to order the list items inside the “Selected Workbook/Worksheets” list box to match the plate order of the target worksheet you are importing data to.
Finish Button: Dismisses the File/Page to Plate Match sub-form saving all the “Selected Workbook/worksheets” list box items and their loading order.
Import Multiple Readings option
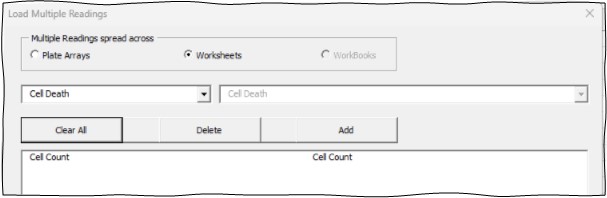
Ticking this option loads the sub-form of Figure 6. The “Multiple Readings Spread across” option box allows the user to cover all the possible combinations of where the different measured variables could reside. The dropdown box to the left and immediately below the option box contains all the measured variables that exist in the target workbook.
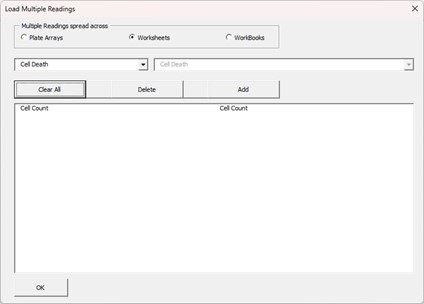
The three possible sources for the multiple dependent variable plate arrays are:
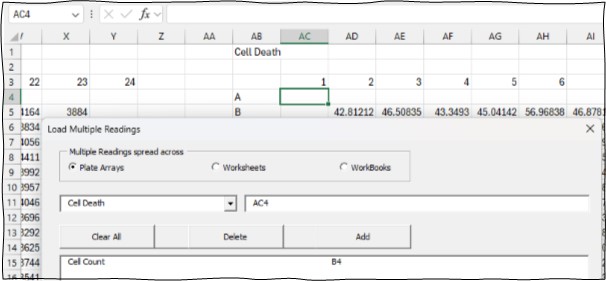
Plate Arrays: This assumes that multiple dependent variables reside on a single worksheet (specified in the worksheet page field of the Source section in the import form). If you want to see an example of a file with data laid out in such a way that you would use plate arrays to import it, then from the Platemaker Wizard tutorial folder, open the file Alternative row data layout.csv

When the Plate Arrays option is selected, the main list table at the bottom of the form records the matchup between the dependent variable worksheets found inside your target workbook and the first cell address of the first plate well that contains data to be imported into that dependent variable. The cell address is entered into the textbox adjacent to the selected dependent variable. Like retrieving the first start well address, you can also use the right mouse button to gain access to the underlying worksheet so you can place the cursor directly on the first cell of the source plate (well A1) and then return the appropriate Excel cell address as shown below (see also Figure 3).
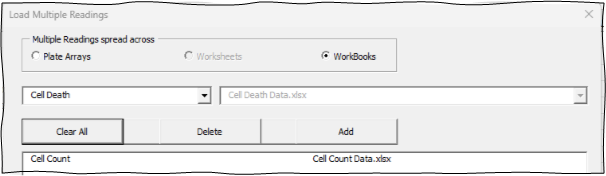
Worksheets: This option should be selected if the user is importing data from a workbook where each plate measurement is in a different worksheet. As soon as the “Worksheets” option is selected, the textbox changes to a dropdown box which is populated by all the worksheets the source workbook selected in the source section of the main import menu contains, independent of whether you have used the multi-source option and your plate data is split across multiple workbooks. Note if your plate data is split across multiple workbooks then when you tick the “Import Multiple Readings” option, the Workbooks option in the “Multiple Readings spread across” section will be disabled because you cannot simultaneously have your plates and dependent data values both split across different workbooks at the same time.
Workbooks: Finally, if the dependent variables are in different workbooks, then selecting the “Workbooks” option will allow you to match up each open source workbook with each target dependent variable worksheet (Figure 7).
Pushing the OK button on this submenu will return you to the main Import menu page. Upon pushing the “Import Data” button, the data will be imported from each workbook and their specified worksheet(s) into each plate in each worksheet contained within the target workbook.
Rotate Plate Function
Imagine a plate layout that is easier to design and execute with the plate rotated sideways. It is easy to specify such a plate layout using the Platemaker Wizard by simply swapping the Row and Column dimensions of the plate on Page 5 of the Wizard. Rotating a 96 well plate would mean changing the row number to 12 and the column number to 8. However, plate reading machines will usually only return the data in the landscape orientation. Using the rotate plate function in the import Wizard specifies that the data be rotated (clockwise or anticlockwise) before it is placed into the target spreadsheet. It is important to remember that if you physically rotated the plate clockwise, when you added the samples to it, then you need to tell the Wizard to rotate the plate anticlockwise before it imports the data.
Using Plate Ranges with the Generic Plate Import Program
It is also possible for the user to specify an Excel range in the “Start Cell Address” field in either the source or target section or place a range in both fields. The program distinguishes ranges based on whether the source area is less or equal to the target plate area and if the target area has been defined as a range in the target “Start Cell Address”.
Click here to learn how the import program operates under each possible source/target range combination.
Main Control buttons
Help: Brings up this section of the user manual.
Cancel: Dismisses the import form without importing data.
Import Data: Runs the import program with the settings specified on the import data form.
Close source workbooks after import option: Tick this option if you want all workbooks that are not Platemaker wizard container workbooks closed after you have run the import program. Warning: all workbooks that are closed by the import program will not have any changes you have made to them saved.