Program Options
Use this form to change the default settings and edit the contents of the saved combo lists.
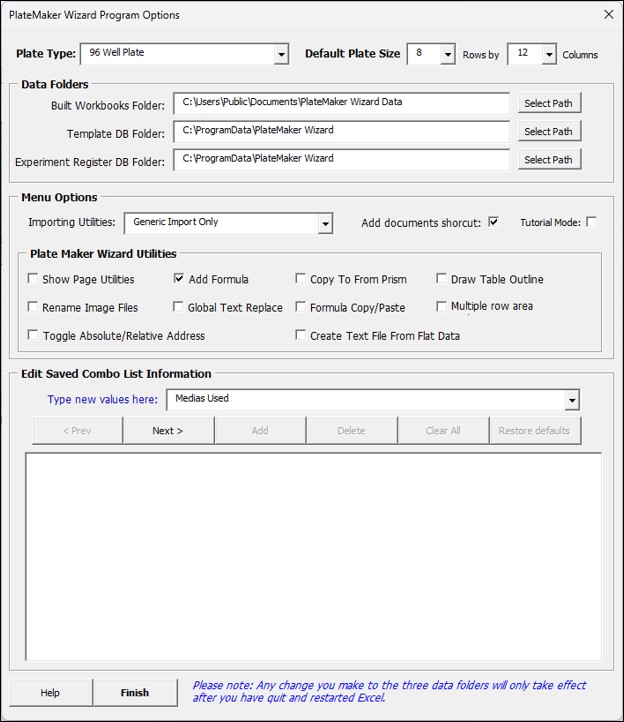
Plate Type and Default Plate Size: Select from the dropdown list menu either 6, 24, 96, 384 or 1,536 or custom well plates. Alternatively, you can specify any default plate size from a minimum of 2 to 32 rows and 2 to 48 columns.
Data folders Section
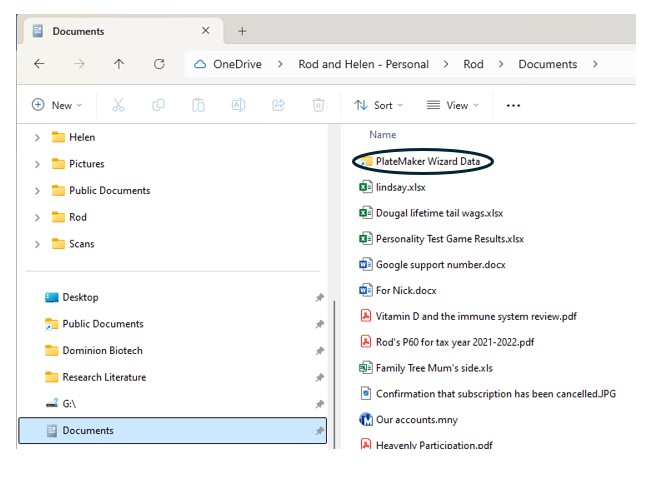
Built Workbook folders: This is the root folder where all the workbooks the Platemaker wizard creates are saved including all the subfolders for Projects or Organizations; Customers or Project Managers; Experiment Titles. The default path is “c:\Users\Public\Public Documents”; meaning all users of that particular computer can access the Platemaker wizard container files that are created by the program on that computer. If you plan to use this software in a lab setting, you probably want to move the folder path to a mapped network server drive (for example “Z:\Public\Documents\Platemaker Wizard Data\”) so that everyone in the lab is saving their work into the same area.
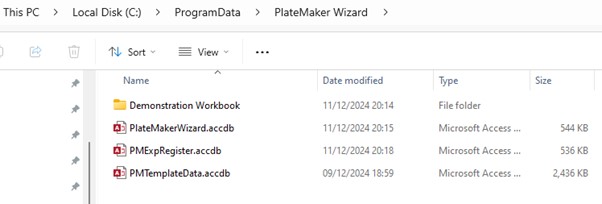
Template DB Folder: The Platemaker wizard uses three different Access databases to manage its data. The template Access database (called PMTemplateData.accdb) saves all the various templates that users develop as part of their workbook building activities. The default folder for this database is c:\ProgramData\PlateMaker Wizard. This location means that all templates that are created for the individual computer on which the Platemaker Wizard is installed, will be saved to that computer but will not be accessible by other computers in the lab. If you want multiple computers accessing the same database of templates, then this Access database file should be moved to a public directory on your server but preferably in a hidden folder so that users cannot inadvertently corrupt or delete the Access database file. As an example, a network manager may choose to move the file to say Z:\Public\”hidden folder name”. Obviously, all users need read/write access rights to this file.
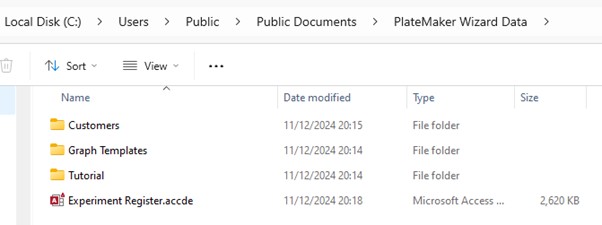
Experiment Register DB Folder: This Access database provides a nice experimental register that keeps track of all the workbooks that have been built by the Platemaker Wizard. The software part of the register should always be kept in the main data folder of the platemaker wizard and is simply called “Experimental Register.accde” (Figure 2).
However, the backend file of the database (called PMExpRegister.accdb), that contains the actual data, can also be moved to its own separate folder either on the local computer or on the public folder of a server. Once again it is recommended that the backend of the database is not stored somewhere which is easily accessed by all lab staff but rather saved to a location inside a hidden folder on your file server while the front end remains visible in the main platemaker wizard data folder. The default location for this backend Access file is “c:\ProgramData\PlateMaker Wizard”; meaning that if this location is not changed, then data in the register will only be available on the local computer.
Select Path Buttons: Click these buttons to be provided a Windows explorer window that allows you to navigate to any folders visible to your local computer. Use the explorer window to physically select the relevant file so that when the window is dismissed the full path to that file is copied to the data folders path field. Note if you cannot physically select the Access file (because you have not yet moved it) you cannot save the new path to the file. Therefore, you should physically move the Access database file to its new location before you update the path to the file in the Data Folder section of the program options form.
Menu Options
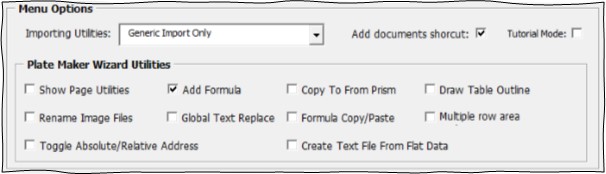
This section controls what options appear in the main Platemaker Wizard menu. The program comes equipped with three different data importing utilities. A generic importing utility (which is the default option) and the possibility of selecting a further two importing utilities: one that works with an Arrayscan Store and one that works with an Incell Analyser.
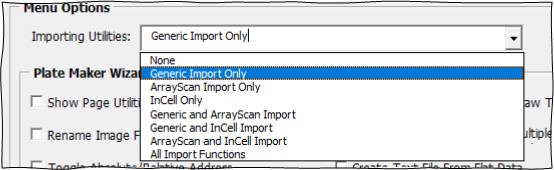
It should be noted however that both the Arrayscan and the InCell utilities were developed by me many years ago. At the time of writing, the necessary Excel Addin that allows Excel to talk to an Arrayscan store (developed by Thermofisher) only works on quite old versions of Microsoft office (Office 2016) while I do not have current information on the file structure now used by an Incell analyser so both utilities might not work on current Incell or Arrayscan installations.
When the Platemaker Wizard is first installed it comes with only a minimal set of utilities showing in the main menu so it does not look too overwhelming. The default utilities allow the user to perform most functions they require to build the container workbooks and perform the data analysis they require. However, in this section it is possible for the user to switch on other useful Platemaker wizard functions which are described (see Platemaker Wizard Utilities in the menu on the right).
Add Documents shortcut: It is anticipated that all lab users will want to access the various files created by the Platemaker wizard. Therefore, the default folder for the Platemaker wizard when it is first installed is c:\users\public\documents\Platemaker Wizard Data.
If this option is checked then the platemaker wizard will automatically put a shortcut link into the user’s personal documents folder so they can easily navigate to the root directory of the platemaker wizard’s data folder whether that is in the default location or if it has been moved to a public network drive say z:\public\platemaker wizard data.
Tutorial Mode: Selecting this option allows the user to access the 16 tutorial templates that are provided with the wizard and used to help complete the 9 tutorials in section 4 (starting page 12) of the supplied instruction manual.
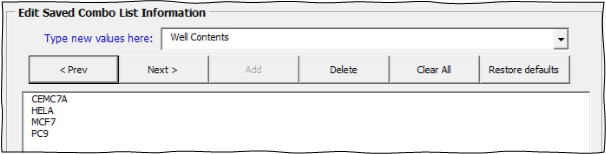
Edit Combo List information
The Platemaker wizard has many forms that contain dropdown list boxes that allow the user to select various items. In general, these list boxes take free text but behind the scenes any text entered into one of these boxes is saved for future reference so when the user returns to the form, the information they entered previously can now be selected from the combo fields dropdown list. Over time, these lists can become very long and unwieldly, so this section of the program options menu allows the user to delete entries they no longer want to see, add new entries that they want the list box to show on future data entry forms or restore the default entries the combo field list box had when they first installed the program.
Use the combo list box on this form or the
- Medias Used
- Well Contents
- Testing Scientist Names
- Experiment Durations
- Column Names
- Dimensions
- Dependent Variable Names
- Dependent Variable Dimensions
Once you have selected which list you want to modify, select values already in the list that you want to delete and push the delete key to delete them. Alternatively use the Clear All button to Clear the list completely or the Restore Defaults button (where available) to return the list to its default values.
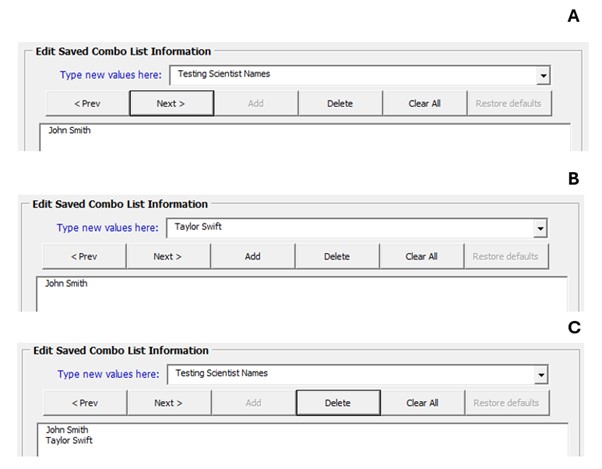
If you want to add a new value to a list when you place the cursor in the dropdown list box that contains the name of the list, the box clears so you type text into the field. Once the text has been added, push the add button to add your new value to the list (Figure 4).
Default list Values for each list
- Medias Used: Empty list
- Well Contents: CEMC7A, HELA, MCF7, PC9
- Testing Scientists: Empty List
- Experiment Durations: 24 hours, 48 hours, 72 hours, 96 hours, 5 days, 6 days, 1 Week, See Plate Map for Details.
- Column Names: Cell Line, Dose, Drug Name, Duration
- Dimensions: pM, nM, µM, mM, M, seconds, minutes, hours, days, pg/ml, pg/µl, ng/ml, ng/µl, µg/ml, µg/µl, mg/ml, g/l, mg/µl, g/ml, mg/kg, µg/kg, g/kg.
- Dependent Variable Names: Cell Count, Cell Death
- Dependent Variable Dimensions: %, Number
- Control Names: DMSO, Ethanol, Vehicle
- Equation Dimensions: Empty List
It should also be noted that program option information is saved separately for each user logged into the computer so different users can have different default lists and program menu options active.